Hunnie Bunn (talk | contribs) (General cleanup.) |
Tag: sourceedit |
||
| (30 intermediate revisions by 10 users not shown) | |||
| Line 4: | Line 4: | ||
|bgcolor2= |
|bgcolor2= |
||
|imageBG= |
|imageBG= |
||
| + | |image=[[File:i38993mfjwik939.png|250px]] |
||
| − | |image= |
||
|name=Underground Chambers |
|name=Underground Chambers |
||
|location=[[Dungeons]], [[Hogwarts Castle]], [[Scotland]], [[Great Britain]] |
|location=[[Dungeons]], [[Hogwarts Castle]], [[Scotland]], [[Great Britain]] |
||
| Line 11: | Line 11: | ||
|affiliation= |
|affiliation= |
||
}} |
}} |
||
| ⚫ | The '''Underground Chambers'''<ref name="pottermore">''[[Pottermore]]'' - [http://www.pottermore.com/en-us/book1/chapter16/moment2/underground-chambers Book 1, Chapter 16, Moment 2]</ref> were a series of rooms below [[Hogwarts School of Witchcraft and Wizardry]], serving as the defences protecting the [[Philosopher's Stone]] from [[1 August]], [[1991]] until [[4 June]], [[1992]]<ref name="PS16" />. There were a total of seven chambers, each of which containing an obstacle or task that guarded the Stone and delayed any intruder<ref name="PS16" />. |
||
| − | |||
| ⚫ | The '''Underground Chambers'''<ref name="pottermore">''[[Pottermore]]''</ref> were a series of rooms below [[Hogwarts School of Witchcraft and Wizardry]], serving as the defences protecting the [[Philosopher's Stone]] from [[1 August]], [[1991]] until [[4 June]], [[1992]]<ref name="PS16"/>. There were a total of seven chambers, each of which containing an obstacle or task that guarded the Stone and delayed any intruder<ref name="PS16"/>. |
||
==Background== |
==Background== |
||
| − | In [[1991]], the [[Philosopher's Stone]] became the target of [[Tom Riddle|Lord Voldemort]] due to its potent ability to return him to full power<ref name="PS16"/>. Suspecting danger, [[Albus Dumbledore]] set out [[Rubeus Hagrid]] to retrieve the Stone from [[Vault 713]] at [[Gringotts Wizarding Bank]] the same day he took [[Harry Potter]] to [[Diagon Alley]]<ref name="PS16"/>. That same day, [[Quirinus Quirrell]], who was being used as a parasite of [[Lord Voldemort]], broke into the bank, but failed to obtain the Stone<ref name="PS16"/>. |
+ | In [[1991]], the [[Philosopher's Stone]] became the target of [[Tom Riddle|Lord Voldemort]] due to its potent ability to return him to full power<ref name="PS16" />. Suspecting danger, [[Albus Dumbledore]] set out [[Rubeus Hagrid]] to retrieve the Stone from [[Vault 713]] at [[Gringotts Wizarding Bank]] the same day he took [[Harry Potter]] to [[Diagon Alley]]<ref name="PS16" />. That same day, [[Quirinus Quirrell]], who was being used as a parasite of [[Lord Voldemort]], broke into the bank, but failed to obtain the Stone<ref name="PS16" />. |
| − | Thereafter, Hagrid brought the Stone to Hogwarts as requested, and [[Professor]]s [[Pomona Sprout]], [[Filius Flitwick]], [[Minerva McGonagall]], [[Quirinus Quirrell]] and [[Severus Snape]], as well as Hagrid and Dumbledore themselves, created each their own separate chamber<ref name="PS16"/>. |
+ | Thereafter, Hagrid brought the Stone to Hogwarts as requested, and [[Professor]]s [[Pomona Sprout]], [[Filius Flitwick]], [[Minerva McGonagall]], [[Quirinus Quirrell]] and [[Severus Snape]], as well as Hagrid and Dumbledore themselves, created each their own separate chamber<ref name="PS16" />. |
==Obstacles== |
==Obstacles== |
||
===First=== |
===First=== |
||
| ⚫ | |||
{{Dialogue a-b-c-b|Ron|What do they think they're doing, keeping a thing like that locked up in a school? If any dog needs exercise, that one does.|Hermione|You don't use your eyes, any of you, do you? Didn't you see what it was standing on?|Harry|The floor? I wasn't looking at its feet, I was too busy with its heads.|No, not the floor. It was standing on a trapdoor. It was obviously guarding something.|Harry, Ron and Hermione|Harry Potter and the Philosopher's Stone}} |
{{Dialogue a-b-c-b|Ron|What do they think they're doing, keeping a thing like that locked up in a school? If any dog needs exercise, that one does.|Hermione|You don't use your eyes, any of you, do you? Didn't you see what it was standing on?|Harry|The floor? I wasn't looking at its feet, I was too busy with its heads.|No, not the floor. It was standing on a trapdoor. It was obviously guarding something.|Harry, Ron and Hermione|Harry Potter and the Philosopher's Stone}} |
||
| ⚫ | |||
| − | The only known way to access the Stone was through a trapdoor in the [[Third Floor Corridor]], which was guarded by the [[three-headed dog]] [[Fluffy]]<ref name="PS16"/>. Fluffy had been purchased |
+ | The only known way to access the Stone was through a trapdoor in the [[Third Floor Corridor]], which was guarded by the [[three-headed dog]] [[Fluffy]]<ref name="PS16" />. Fluffy had been purchased to a [[Greek man]] in [[The Leaky Cauldron]] by [[Rubeus Hagrid]], and was later put into the third floor<ref name="PS16" />. To get past this obstacle, one had only to play some music, which would then put Fluffy to sleep<ref name="PS16" />. |
===Second=== |
===Second=== |
||
| ⚫ | {{Dialogue a-b-a-c|Hermione|[[Devil's Snare]], Devil's Snare... What did [[Pomona Sprout|Professor Sprout]] say? It likes the dark and the damp —|Harry|So light a fire!|Yes — of course — but there's no wood!|Ron|HAVE YOU GONE MAD? ARE YOU A WITCH OR NOT?|Harry, Ron and Hermione|Harry Potter and the Philosopher's Stone}} |
||
| ⚫ | |||
| ⚫ | [[File:Devil.JPG|thumb|220px|Sprout's Chamber]]After going through the trapdoor, a long and dark drop through the air led into a chamber full of [[Devil's Snare]], planted by the [[Herbology]] teacher [[Pomona Sprout]]<ref name="PS16" />. The plant was designed to entangle and suffocate any intruders, especially quickly the more the intruder tries to escape<ref name="PS16" />. [[Bluebell Flames]], however, could be used to repulse them<ref name="PS16" />. |
||
| ⚫ | {{Dialogue a-b-a-c|Hermione|[[Devil's Snare]], Devil's Snare... What did [[Pomona Sprout|Professor Sprout]] say? It likes the dark and the damp |
||
| − | |||
| ⚫ | After going through the trapdoor, a long and dark drop through the air led into a chamber full of [[Devil's Snare]], planted by the [[Herbology]] teacher [[Pomona Sprout]]<ref name="PS16"/>. The plant was designed to entangle and suffocate any intruders, especially quickly the more the intruder tries to escape<ref name="PS16"/>. [[Bluebell Flames]], however, could be used to repulse them<ref name="PS16"/>. |
||
===Third=== |
===Third=== |
||
| ⚫ | |||
| − | [[File:Chamber3.png|thumb|Flitwick's Chamber]] |
+ | [[File:Chamber3.png|thumb|left|240px|Flitwick's Chamber]] |
| ⚫ | A downwards sloping passage with stone walls, through which trickling water could be heard, led to a brilliantly lit chamber with a very high ceiling, full of glittering winged keys, charmed by [[Filius Flitwick]]<ref name="PS16" />. On the opposite end of the chamber from the stone passage was a large, old-fashioned wooden door with a silver lock that would not open, even with the [[Unlocking Charm|Alohomora Charm]], without the necessary key<ref name="PS16" />. One had to mount a [[broom]] and attempt to pursue the correct key; all of the keys fluttered away quickly, darting around, making it very difficult to catch the correct one<ref name="PS16" />. |
||
| ⚫ | |||
| − | |||
| ⚫ | A downwards sloping passage with stone walls, through which trickling water could be heard, led to a brilliantly lit chamber with a very high ceiling, full of glittering winged keys, charmed by [[Filius Flitwick]]<ref name="PS16"/>. On the opposite end of the chamber from the stone passage was a large, old-fashioned wooden door with a silver lock that would not open, even with the [[Unlocking Charm|Alohomora Charm]], without the necessary key<ref name="PS16"/>. One had to mount a [[broom]] and attempt to pursue the correct key; all of the keys fluttered away quickly, darting around, making it very difficult to catch the correct one<ref name="PS16"/>. |
||
===Fourth=== |
===Fourth=== |
||
| ⚫ | |||
| − | |||
{{Quote|I think we're going to have to be chessmen.|Ron|Harry Potter and the Philosopher's Stone}} |
{{Quote|I think we're going to have to be chessmen.|Ron|Harry Potter and the Philosopher's Stone}} |
||
| ⚫ | |||
| − | The next chamber was so dark that it was impossible to see anything<ref name="PS16"/>. It contained a [[Human Chess Game]], which had been [[Piertotum Locomotor|enchanted]] by [[Minerva McGonagall]]<ref name="PS16"/>. To get across the chamber, one had to checkmate the King according to the rules of [[Wizard's Chess]]<ref name="PS16"/>. |
+ | The next chamber was so dark that it was impossible to see anything<ref name="PS16" />. It contained a [[Human Chess Game]], which had been [[Piertotum Locomotor|enchanted]] by [[Minerva McGonagall]]<ref name="PS16" />. To get across the chamber, one had to checkmate the King according to the rules of [[Wizard's Chess]]<ref name="PS16" />. |
===Fifth=== |
===Fifth=== |
||
| − | [[File:Quirrell's Obstacle.png|thumb|Quirrell's Obstacle]] |
||
| − | |||
{{Dialogue a-b|Hermione|Go on.|Harry|I'm glad we didn't have to fight that one, come on, I can't breathe.|Harry Potter|Harry Potter and the Philosopher's Stone}} |
{{Dialogue a-b|Hermione|Go on.|Harry|I'm glad we didn't have to fight that one, come on, I can't breathe.|Harry Potter|Harry Potter and the Philosopher's Stone}} |
||
| − | After that came a chamber containing a [[mountain troll]] that needed to be knocked out in order to pass; it had a foul odour in it, and it was said that there was great relief in passing through it<ref name="PS16"/>. |
+ | After that came a chamber containing a [[mountain troll]] that needed to be knocked out in order to pass; it had a foul odour in it, and it was said that there was great relief in passing through it<ref name="PS16" />. |
===Sixth=== |
===Sixth=== |
||
| ⚫ | |||
| ⚫ | |||
| ⚫ | |||
| ⚫ | The second-to-last obstacle guarding the Stone was a logical riddle set by [[Severus Snape]]<ref name="PS16" />. Upon entering the chamber, the entrance was blocked by [[purple flames]], whilst the exit was covered by [[black flames]]<ref name="PS16" />. A table holding seven bottles of differing shapes and sizes sat in the centre of the room<ref name="PS16" />. |
||
| ⚫ | |||
| ⚫ | Each bottle contained a liquid, but the bottles were not labelled with their contents<ref name="PS16" />. Three were [[poison]], two contained [[nettle wine]], one contained a [[Fire Protection Potion|potion]] to safely traverse the black flame, and the last contained a [[Fire Protection Potion|potion]] that allowed passage back through the purple flames<ref name="PS16" />. The riddle, when properly worked out, revealed the contents of each bottle, and therefore which one was safe to drink to allow onward progress: |
||
| ⚫ | The second-to-last obstacle guarding the Stone was a logical riddle set by [[Severus Snape]]<ref name="PS16"/>. Upon entering the chamber, the entrance was blocked by [[purple flames]], whilst the exit was covered by [[black flames]]<ref name="PS16"/>. A table holding seven bottles of differing shapes and sizes sat in the centre of the room<ref name="PS16"/>. |
||
| − | |||
| ⚫ | Each bottle contained a liquid, but the bottles were not labelled with their contents<ref name="PS16"/>. Three were [[poison]], two contained [[nettle wine]], one contained a [[Fire Protection Potion|potion]] to safely traverse the black flame, and the last contained a [[Fire Protection Potion|potion]] that allowed passage back through the purple flames<ref name="PS16"/>. The riddle, when properly worked out, revealed the contents of each bottle, and therefore which one was safe to drink to allow onward progress: |
||
<center>"''Danger lies before you, while safety lies behind,''</center> |
<center>"''Danger lies before you, while safety lies behind,''</center> |
||
| Line 80: | Line 72: | ||
<center>''Fourth, the second left and the second on the right''</center> |
<center>''Fourth, the second left and the second on the right''</center> |
||
<center>''Are twins once you taste them, though different at first sight.''" <sup>[[Harry Potter and the Philosopher's Stone|[src]]]</sup></center> |
<center>''Are twins once you taste them, though different at first sight.''" <sup>[[Harry Potter and the Philosopher's Stone|[src]]]</sup></center> |
||
| ⚫ | |||
| − | |||
| − | Based on Hermione's deductions, from left to right, the potions lineup is: |
+ | Based on Hermione's deductions, from left to right, the potions lineup is:<ref name="PS16" /> |
| − | #[[Poison]] |
+ | #[[Poison]] |
#[[Nettle wine]] |
#[[Nettle wine]] |
||
#[[Black fire potion|Potion to move the drinker forward through black flames]] |
#[[Black fire potion|Potion to move the drinker forward through black flames]] |
||
#[[Poison]] |
#[[Poison]] |
||
| − | #[[ |
+ | #[[Weedosoros]] |
#[[Nettle wine]] |
#[[Nettle wine]] |
||
#[[Purple fire potion|Potion to move the drinker backwards through purple flames]] |
#[[Purple fire potion|Potion to move the drinker backwards through purple flames]] |
||
| − | <ref name="PS16"/> |
||
===Seventh=== |
===Seventh=== |
||
| − | [[File: |
+ | [[File:Mirror_of_Erised.png|thumb|130px|[[Mirror of Erised]]]] |
| − | |||
{{Dialogue a-b|Harry|You!|Quirrell|Me, I wondered whether I'd be meeting you here, Potter.|Harry Potter discovering Professor Quirell in the seventh chamber|Harry Potter and the Philosopher's Stone}} |
{{Dialogue a-b|Harry|You!|Quirrell|Me, I wondered whether I'd be meeting you here, Potter.|Harry Potter discovering Professor Quirell in the seventh chamber|Harry Potter and the Philosopher's Stone}} |
||
| − | The final obstacle was the [[Mirror of Erised]], designed and set by [[Albus Dumbledore]]<ref name="PS16"/>. The only way to obtain the stone was for an individual to look into the mirror and see themselves possessing the stone but not using it<ref name="PS16"/>. |
+ | The final obstacle was the [[Mirror of Erised]], designed and set by [[Albus Dumbledore]]<ref name="PS16" />. The only way to obtain the stone was for an individual to look into the mirror and see themselves possessing the stone but not using it<ref name="PS16" />. |
==Behind the scenes== |
==Behind the scenes== |
||
| Line 135: | Line 125: | ||
|'''Disc 1:''' Harry catches the key.<br />'''Disc 2:''' You must search and click on the right winged key. |
|'''Disc 1:''' Harry catches the key.<br />'''Disc 2:''' You must search and click on the right winged key. |
||
|Same as film. |
|Same as film. |
||
| − | |Same as film. However, the wrong keys shine red and the right key shine blue and |
+ | |Same as film. However, the wrong keys shine red and the right key shine blue and its wing is not broken. |
| style="text-align: center"|You must search and click on the right winged key. |
| style="text-align: center"|You must search and click on the right winged key. |
||
|Same as film. |
|Same as film. |
||
| Line 193: | Line 183: | ||
*''[[LEGO Harry Potter: Characters of the Magical World]]'' {{Mention}} |
*''[[LEGO Harry Potter: Characters of the Magical World]]'' {{Mention}} |
||
*''[[LEGO Harry Potter: Years 1-4]]'' |
*''[[LEGO Harry Potter: Years 1-4]]'' |
||
| + | *''[[Harry Potter for Kinect]]'' |
||
*''[[Pottermore]]'' |
*''[[Pottermore]]'' |
||
*''[[LEGO Harry Potter|Harry Potter LEGO Sets]]'' |
*''[[LEGO Harry Potter|Harry Potter LEGO Sets]]'' |
||
| Line 202: | Line 193: | ||
[[it:Camere sotterranee]] |
[[it:Camere sotterranee]] |
||
| + | [[ru:Подвалы Хогвартса]] |
||
[[Category:Hogwarts locations]] |
[[Category:Hogwarts locations]] |
||
[[Category:Underground Chambers]] |
[[Category:Underground Chambers]] |
||
Revision as of 04:54, 29 June 2015
The Underground Chambers[2] were a series of rooms below Hogwarts School of Witchcraft and Wizardry, serving as the defences protecting the Philosopher's Stone from 1 August, 1991 until 4 June, 1992[1]. There were a total of seven chambers, each of which containing an obstacle or task that guarded the Stone and delayed any intruder[1].
Background
In 1991, the Philosopher's Stone became the target of Lord Voldemort due to its potent ability to return him to full power[1]. Suspecting danger, Albus Dumbledore set out Rubeus Hagrid to retrieve the Stone from Vault 713 at Gringotts Wizarding Bank the same day he took Harry Potter to Diagon Alley[1]. That same day, Quirinus Quirrell, who was being used as a parasite of Lord Voldemort, broke into the bank, but failed to obtain the Stone[1].
Thereafter, Hagrid brought the Stone to Hogwarts as requested, and Professors Pomona Sprout, Filius Flitwick, Minerva McGonagall, Quirinus Quirrell and Severus Snape, as well as Hagrid and Dumbledore themselves, created each their own separate chamber[1].
Obstacles
First
- Ron: "What do they think they're doing, keeping a thing like that locked up in a school? If any dog needs exercise, that one does."
- Hermione: "You don't use your eyes, any of you, do you? Didn't you see what it was standing on?"
- Harry: "The floor? I wasn't looking at its feet, I was too busy with its heads."
- Hermione: "No, not the floor. It was standing on a trapdoor. It was obviously guarding something."
- — Harry, Ron and Hermione[src]
Hagrid's Chamber
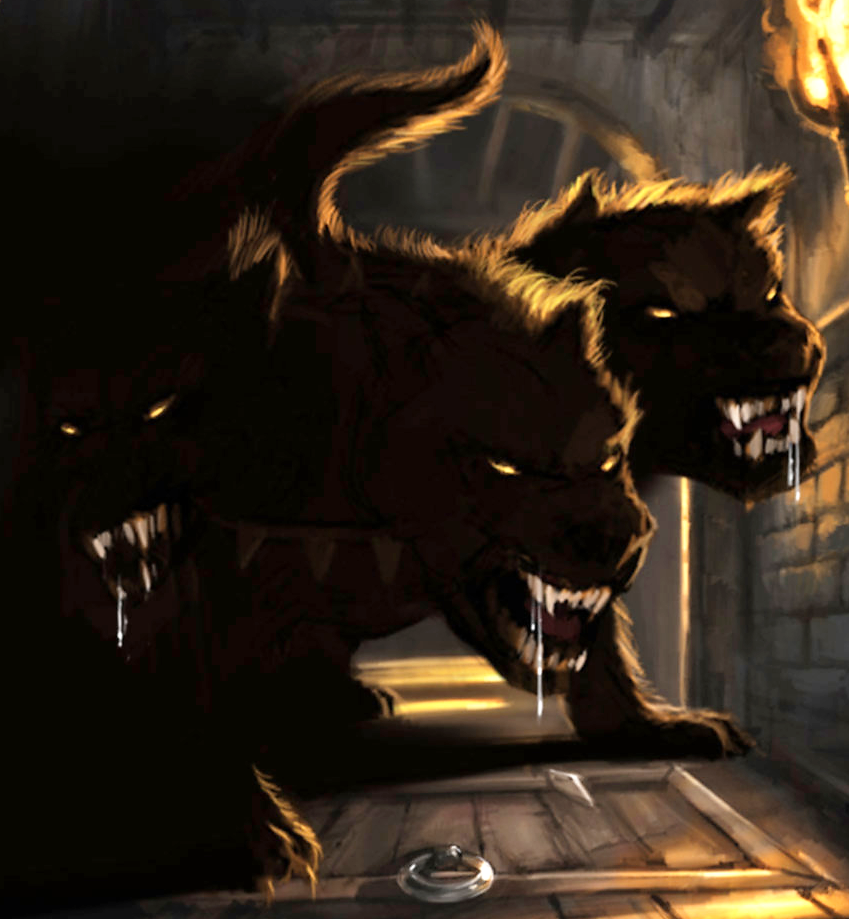
The only known way to access the Stone was through a trapdoor in the Third Floor Corridor, which was guarded by the three-headed dog Fluffy[1]. Fluffy had been purchased to a Greek man in The Leaky Cauldron by Rubeus Hagrid, and was later put into the third floor[1]. To get past this obstacle, one had only to play some music, which would then put Fluffy to sleep[1].
Second
- Hermione: "Devil's Snare, Devil's Snare... What did Professor Sprout say? It likes the dark and the damp —"
- Harry: "So light a fire!"
- Hermione: "Yes — of course — but there's no wood!"
- Ron: "HAVE YOU GONE MAD? ARE YOU A WITCH OR NOT?"
- — Harry, Ron and Hermione[src]
Sprout's Chamber
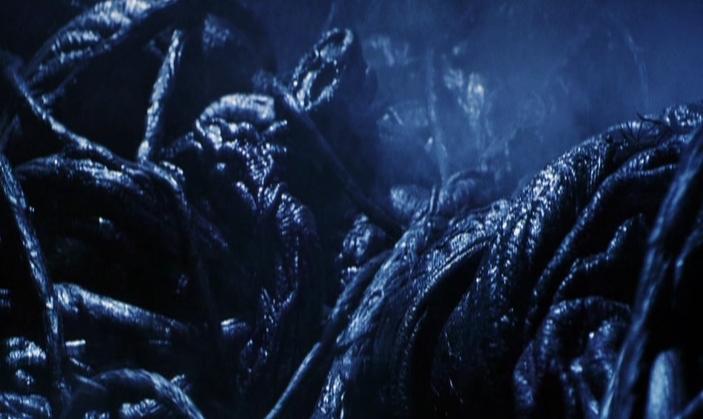
After going through the trapdoor, a long and dark drop through the air led into a chamber full of Devil's Snare, planted by the Herbology teacher Pomona Sprout[1]. The plant was designed to entangle and suffocate any intruders, especially quickly the more the intruder tries to escape[1]. Bluebell Flames, however, could be used to repulse them[1].
Third
- "They're not birds! They're keys! Winged keys — look carefully. So that must mean... Yes — look! Broomsticks! We've got to catch the key to the door!"
- — Harry[src]
Flitwick's Chamber
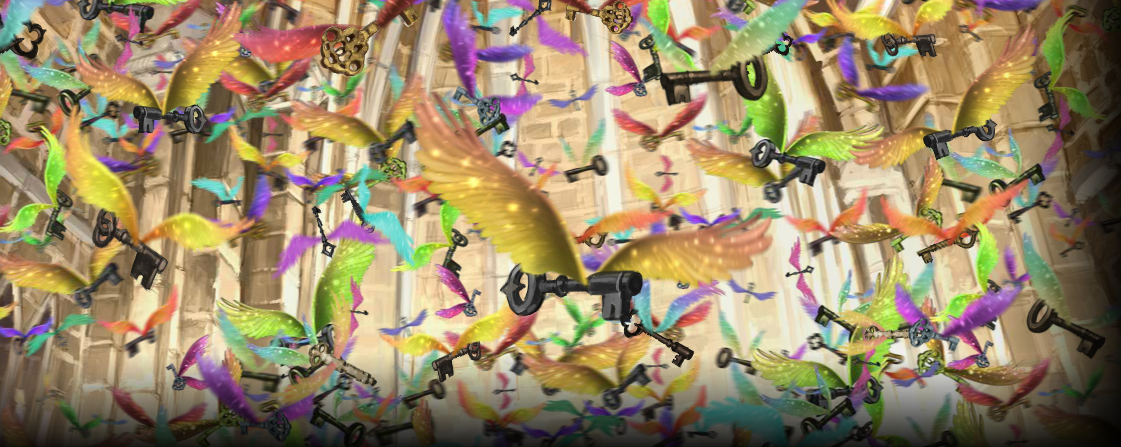
A downwards sloping passage with stone walls, through which trickling water could be heard, led to a brilliantly lit chamber with a very high ceiling, full of glittering winged keys, charmed by Filius Flitwick[1]. On the opposite end of the chamber from the stone passage was a large, old-fashioned wooden door with a silver lock that would not open, even with the Alohomora Charm, without the necessary key[1]. One had to mount a broom and attempt to pursue the correct key; all of the keys fluttered away quickly, darting around, making it very difficult to catch the correct one[1].
Fourth
- "I think we're going to have to be chessmen."
- — Ron[src]


McGonagall's Chamber
The next chamber was so dark that it was impossible to see anything[1]. It contained a Human Chess Game, which had been enchanted by Minerva McGonagall[1]. To get across the chamber, one had to checkmate the King according to the rules of Wizard's Chess[1].
Fifth
- Hermione: "Go on."
- Harry: "I'm glad we didn't have to fight that one, come on, I can't breathe."
- — Harry Potter[src]
After that came a chamber containing a mountain troll that needed to be knocked out in order to pass; it had a foul odour in it, and it was said that there was great relief in passing through it[1].
Sixth
- "Brilliant. This isn't magic — it's logic — a puzzle. A lot of the greatest wizards haven't got an ounce of logic, they'd be stuck in here for ever."
- — Hermione[src]

Snape's Chamber
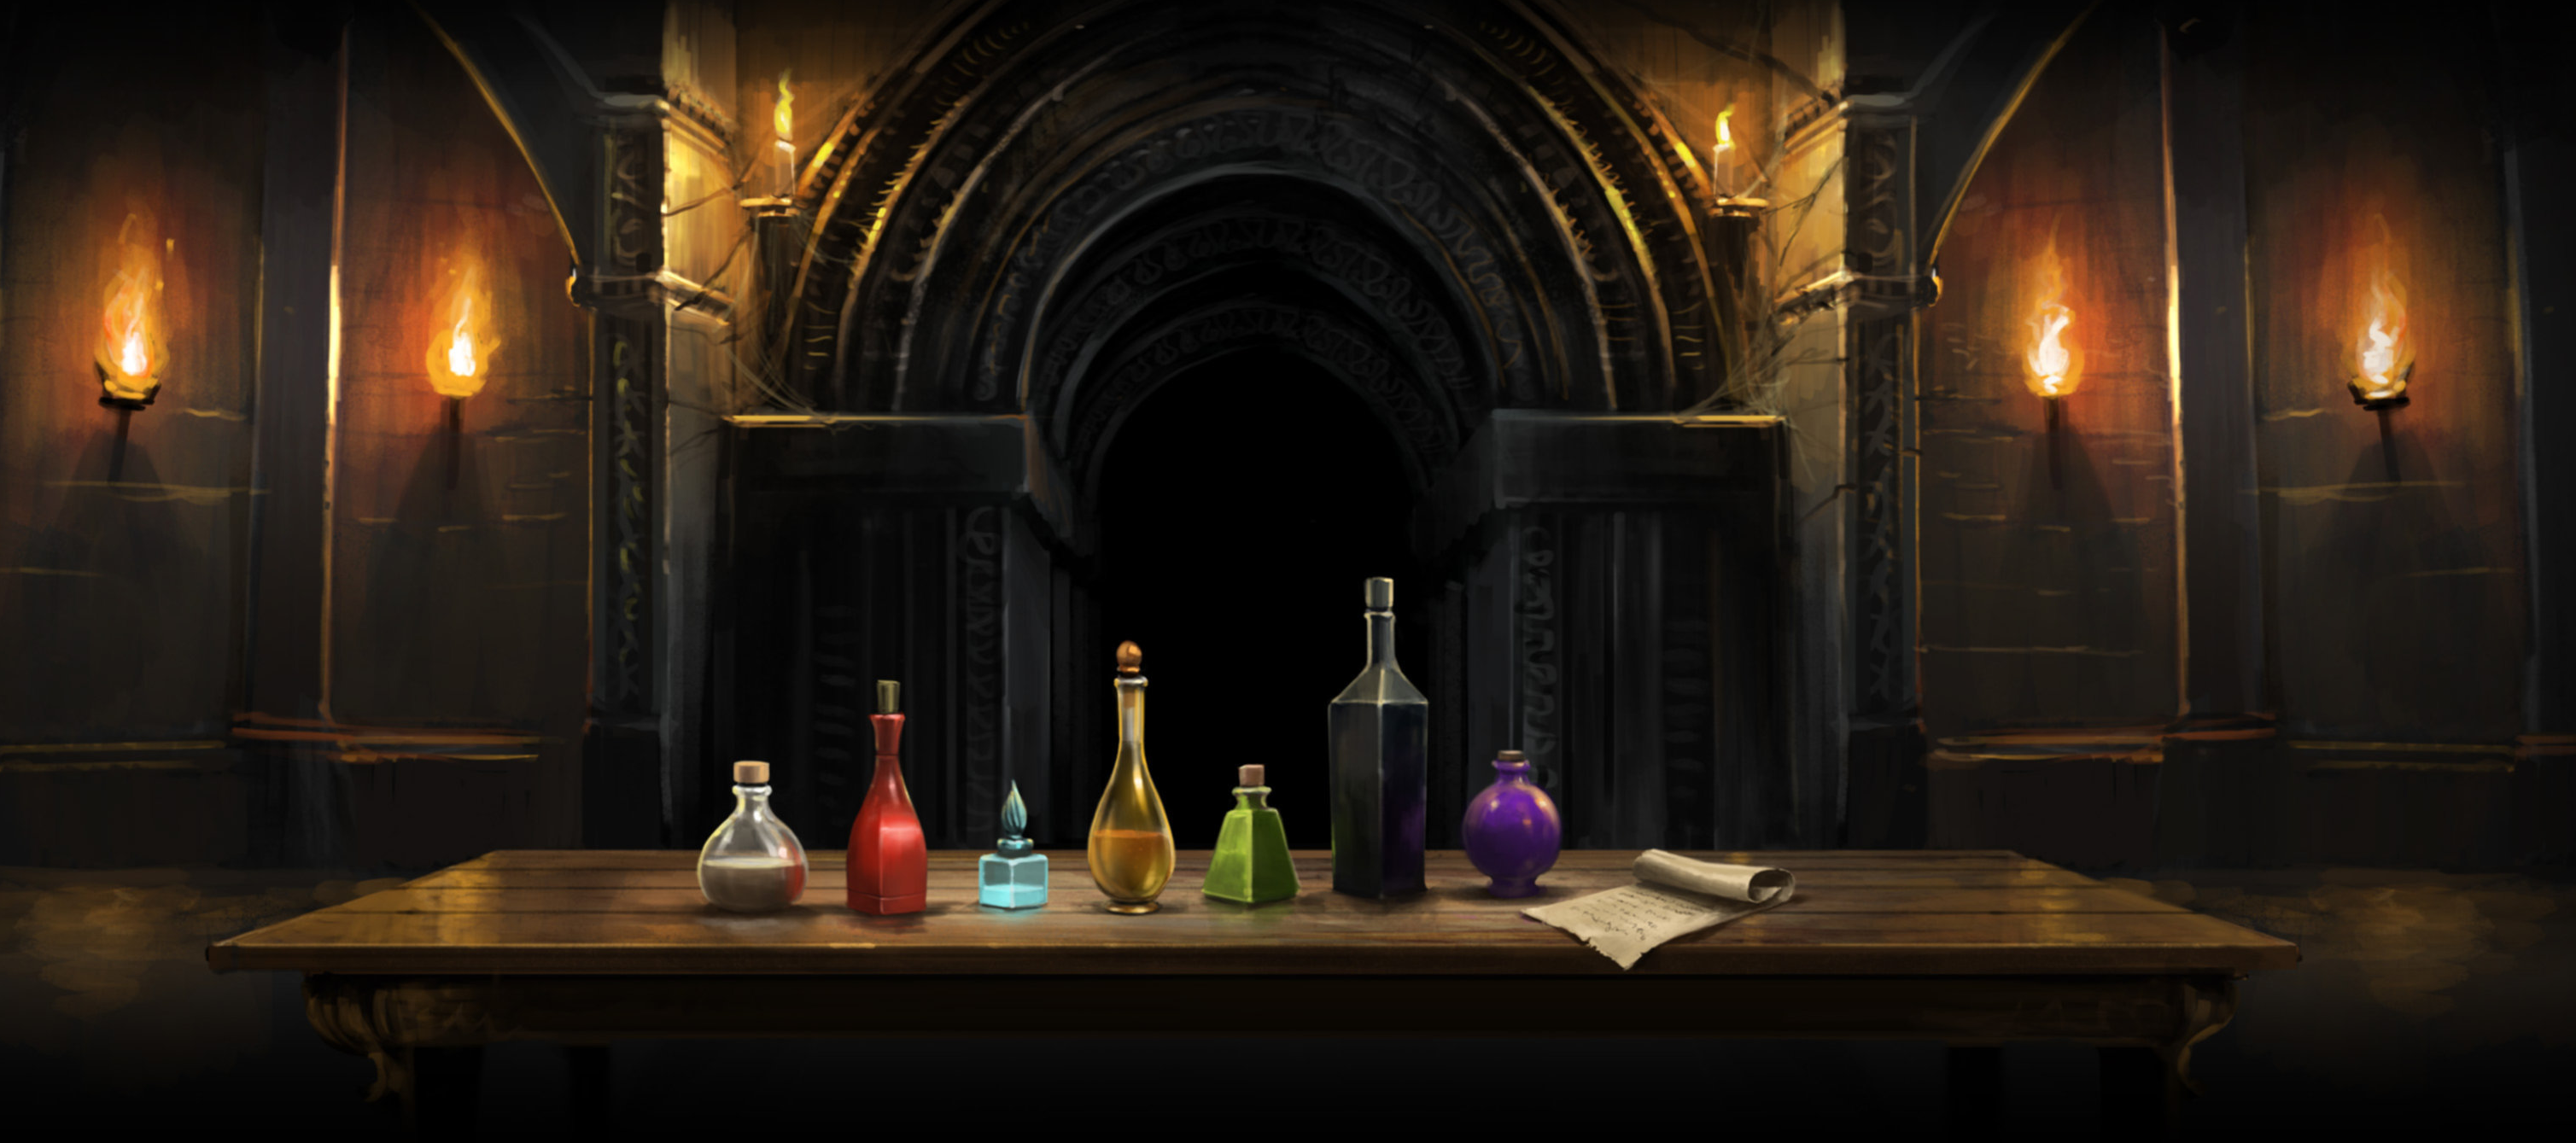
The second-to-last obstacle guarding the Stone was a logical riddle set by Severus Snape[1]. Upon entering the chamber, the entrance was blocked by purple flames, whilst the exit was covered by black flames[1]. A table holding seven bottles of differing shapes and sizes sat in the centre of the room[1].
Each bottle contained a liquid, but the bottles were not labelled with their contents[1]. Three were poison, two contained nettle wine, one contained a potion to safely traverse the black flame, and the last contained a potion that allowed passage back through the purple flames[1]. The riddle, when properly worked out, revealed the contents of each bottle, and therefore which one was safe to drink to allow onward progress:

Based on Hermione's deductions, from left to right, the potions lineup is:[1]
- Poison
- Nettle wine
- Potion to move the drinker forward through black flames
- Poison
- Weedosoros
- Nettle wine
- Potion to move the drinker backwards through purple flames
Seventh


- Harry: "You!"
- Quirrell: "Me, I wondered whether I'd be meeting you here, Potter."
- — Harry Potter discovering Professor Quirell in the seventh chamber[src]
The final obstacle was the Mirror of Erised, designed and set by Albus Dumbledore[1]. The only way to obtain the stone was for an individual to look into the mirror and see themselves possessing the stone but not using it[1].
Behind the scenes
- The prevalence of the number seven is not coincidental; seven obstacles were in place to get to the Philosopher's Stone and seven different potions were available in Snape's logic riddle. Seven, as deduced by Arithmancer Bridget Wenlock, has magical properties to it. It is believed that the number seven is the most magical number. It is also, of course, the total number of books in the series, with Rowling firmly sticking to that number.
- The fifth and sixth obstacles were cut from the film. The potions riddle, however, was later shown in the second disc.
- There were a lot of differences in the Chambers between the books, films and video games, shown in the following table:
| Room | Book | Film | PC Game | PS1 Game | Pottermore | GBC/GBA Game | LEGO Years 1-4 |
|---|---|---|---|---|---|---|---|
| Fluffy's Chamber and Through the Trapdoor | Harry and then Hermione played the flute Hagrid gave Harry for Christmas. | Disc 1: Quirrell bewitched a harp to play itself. Disc 2: The player has to choose between four items: the Cloak of Invisibility, a chicken, a bone or a flute. |
Harry plays the flute Hagrid gave him and has to put all 3 heads asleep at once; the heads will wake up once asleep enough. | Harry plays the flute Hagrid gave him. | Not seen. | Same as PS1. | Desktop: When Harry, Ron and Hermione enter the room to see Quirrell climb into the room, when he finds out they have seen him he destroys the playing harp and wakes Fluffy. Ron tries playing a trumpet but it doesn't work. In order to fix the harp they have to distract Fluffy with a rubber duck. Handheld: When Harry, Ron and Hermione enter the room to see Quirrell climb into the room, when he finds out they have seen him he destroys the playing harp and wakes Fluffy. Ron tries playing a trumpet but it doesn't work. Fluffy then chase Harry through the Third Floor until Harry jumps through the trapdoor. |
| Devil's Snare | The three are grabbed by the Devil's Snare; Hermione defeats it with Bluebell flames. | Disc 1: The three are grabbed by the Devil's Snare; Hermione's directions were to relax, after which the plant would release Harry and Ron. However, Ron, being the last one trapped, and being afraid, couldn't calm himself enough leading Hermione to cast Lumos Solem, allowing Ron to slip through. Disc 2: Not seen. |
Only Ron and Hermione are grabbed by the Devil's Snare; Harry defeats it with the Fire-Making Spell. | Same as PC. | Not seen. | GBC: Only Ron and Hermione are grabbed by the Devil's Snare and Harry defeats it in a duel. GBA: Only Ron and Hermione are grabbed by the Devil's Snare; Harry defeats it by burning it with torches. |
Desktop: Only Ron is grabbed by the Devil's Snare; Harry defeats it with the Wand-Lighting Charm. Handheld: Not seen. |
| Winged Keys | Harry, Ron and Hermione catch the key. | Disc 1: Harry catches the key. Disc 2: You must search and click on the right winged key. |
Same as film. | Same as film. However, the wrong keys shine red and the right key shine blue and its wing is not broken. | You must search and click on the right winged key. | Same as film. | Desktop: Same as film, except for the fact that Harry shoot spells at the key. Handheld: Harry finds the hideout of the key, then same as film. |
| Giant Chess Board | Harry is a bishop, Hermione is a rook, Ron is a Knight and is injured after sacrificing the Knight in order to win. | Same as book, except Ron rides the Knight instead of taking its place. | Ron defeats most of the pieces and gets injured, Harry defeats the rest, Hermione doesn't play and Harry and Ron need to get the pieces to attack each other, but not attack them. | There are three boards; Ron defeats most of the pieces on the first board and gets injured, Harry defeats the rest, Hermione doesn't play. | You just see a few pieces move around. | GBC: Ron defeats the Queen and gets injured, Harry defeats the rest, Hermione doesn't play. GBA: Harry paralyses all the pieces on top of the door-opening platforms, realising the lack of pieces to all the platforms, Ron stays on top of the last one. |
Desktop: After directing the pieces on the board where to move and winning, Ron trips over the King's sword and watches the doors close after Harry and Hermione enter next room. Handheld:Ron gets injured from start, Harry have to answer three questions in order to make the pieces move and win. |
| Mountain Troll Chamber | The Troll is already collapsed on the floor when Harry and Hermione arrive. | Not seen. However a bit of the Chamber is shortly seen. | Not seen. | The Troll was collapsed but wakes up when Harry and Hermione get there. The Troll is still groggy so while Hermione tries to unlock the next door, Harry levitates the litter present in the room from out of the Troll's way, without making noise. The Troll doesn't notice a hole on the floor and falls into it. | Not seen. | GBC: Same as book. GBA: Not seen. |
Desktop: Not seen. However a bit of the Chamber is shortly seen. Handheld: Not seen. |
| Potion Riddle | Hermione solves the riddle; Harry goes through the Black Flames, Hermione goes through the Purple Flames to go get help as there is only enough potion for one of them to go through the black flames. | Disc 1: Not seen. Disc 2: The player must click on the right potion. |
Harry solves the riddle by watching the 7 containers move, and must select the one that has the correct potion; Harry goes through the Black Flames, the Purple Flames disappear. | Harry has to guess which knight has the Ice Potion. | You must read the riddle and figure out the correct two potions. | GBC: Harry has to mix and brew the potion, solving the riddle. GBA: Harry and Hermione have to look for the four potion ingredients, scattered trough the dungeon. |
Desktop: Not seen. Handheld: Not seen. |
| Mirror of Erised Antechamber | Not seen | Not seen | Harry has to push the blocks to get to the Mirror of Erised room, while Quirrell pushes the blocks back at him and tries to curse him. | Quirrell brings suits of armour to life and summons one gigantic suit of armour. | Not seen | GBC: Harry duels with Quirrell. GBA: Harry dodges Quirrell's curses, making him destroy the floor. Then, they both fall into the Mirror of Erised Chamber. |
Not seen. |
| Mirror of Erised Chamber | Harry struggles against Quirrell and Voldemort, but passes out before Quirrell dies. | Harry struggles against Quirrell and Voldemort, watches Quirrell die, and passes out when Voldemort's soul passes through him. | Harry tries to kill Quirrell/Voldemort by collapsing pillars on top of him and he also tries to deflect Voldemort's curses with the Mirror. Harry passes out at the same time Quirrell dies. Dumbledore then bursts in to the room. | Harry tries to kill Quirrell/Voldemort by collapsing pillars on top of him and he also tries to boost his jinxes with the Mirror, and then directing it to Voldemort. Harry watches Quirrell die. | You must find the Philosopher's Stone. (It was in Harry's pocket.) | GBC: Harry duels with Voldemort and passes out when he touches him. He doesn't see Quirrell die. GBA: Harry deflects Voldemort's curses with the Mirror and passes out when he touches him. He doesn't see Quirrell die. |
Desktop: Harry battles with Quirrell, hurling his own green cursed heads back at him, after touching him 3 times Quirrell burns away and Harry passes out. Handheld: Harry has to lit the torches to make the fire graves bubble with lava. Then some blocks appear, but when destroyed let go of a heavy object that knocks Quirrell out (Harry does this 3 times). |
Appearances
- Harry Potter and the Philosopher's Stone
- Harry Potter and the Philosopher's Stone (film)
- Harry Potter and the Philosopher's Stone (video game)
- LEGO Harry Potter: Building the Magical World
- LEGO Harry Potter: Characters of the Magical World (Mentioned only)
- LEGO Harry Potter: Years 1-4
- Harry Potter for Kinect
- Pottermore
- Harry Potter LEGO Sets